As an experiment I installed MediaWiki on my Raspberry Pi. I was surprised how well it ran and thought I would share with you the installation process for this. That way you can have your own personal wiki to store information about your school, information about your projects, or even information about your Raspberry Pi. In short anything which you normally jot down can be stored in the wiki and easily retrieved...
Before we get onto the installation of MediaWiki its worth pointing out that you are installing a LAMP server onto your Raspberry Pi. So what does LAMP stand for? It stands for Linux, Apache, MySQL and PHP.
- Linux, you should all be familiar with, I hope. :-)
- Apache is a web server. You will be connecting to the wiki remotely, via a web browser, from another machine.
- MySQL is a database to store all the information from the wiki.
- PHP is a programming language used for web applications.
OK enough talking on with it!
Installation
Most of the installation will be through the command line. You can do this directly through LXTerminal (the icon for this is on the Raspberry Pi desktop) or accessing your Raspberry Pi remotely via SSH.
sudo apt-get update
sudo apt-get install mediawiki
You will shortly be asked for a password for MySQL. It is a good idea to set a password at this time.
Now you need to modify a file called apache.conf. This file is stored in the 'mediawiki' folder, which in turn, is inside the 'etc' folder. We can modify this using a text editor called nano through the command line. To do this type:
We need to remove the # from the third line down so it changes from
#Alias /mediawiki /var/lib/mediawiki
to
Alias /mediawiki /var/lib/mediawiki
As we are doing this in the command line you need to move down to the start of the third line by pressing the down arrow on the keyboard twice. To delete the # press the delete key.
Now to save the file you need to press Ctrl-X (Press the control key and while holding this down, press the X key). A message will appear asking if you want to save the file.
Great you have just modified your file using only the command line.
Next you need to install php-apc for object caching and Imagemagick for thumbnailing.
Lets do both these together shall we?
sudo apt-get install php-apc imagemagick
press Y when asked do you want to continue.
Dont worry if you find one of these has already been installed.
You now need to restart the apache server by typing.
sudo apache2ctl restart
For those of you who read the comments of my blog you will notice that something changed recently which meant these instructions stopped working. Thanks to some other excellent comments a fix was suggested. So we will quickly carry out that fix.
The first thing you need to do is to edit the apache2.conf file
sudo nano /etc/apache2/apache2.conf
Scroll to the bottom of this file and type
Include /etc/mediawiki/apache.conf
Press Ctrl-X to save, and type Y to agree to the changes.
Now you will need to restart the apache2 server by typing
sudo /etc/init.d/apache2 restart
That should fix any issue there was, so we can now continue as though there was never a problem! :-)
Right thats all we can do by SSH for now.
We now need access to the desktop on the Raspberry Pi. If you want to remotely access your Raspberry Pi desktop follow these instructions to VNC into the Raspberry Pi first. If you are directly connected, or have already connected via VNC, then the first thing you need to do is open your web browser.
When I first wrote this blog post the choice of default web browsers on the Raspberry Pi was poor, and you had to install Chromium to carry out the next stage. However the latest versions of Raspbian ship with Chromium already installed. Just be aware that there may be issues with some browsers when carrying out the next stages.
Open up the Chromium Web Browser and type the following web address into the address bar at the top.
http://localhost/mediawiki
Which should now take you to a web address with the following icon and information below it.
Click on the blue text below which says "set up the wiki"
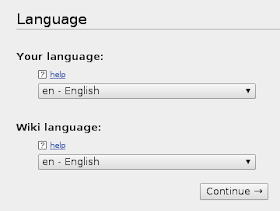
The first screen asks you to select your language. If you are happy with the default options, then you can just click on Continue.
The next page shows that some Environmental Checks have been carried out.
Approximately halfway down the page you should see the following message.
There is nothing you need to type in this window, so you can click on continue at the bottom.
Approximately halfway down the page you should see the following message.
There is nothing you need to type in this window, so you can click on continue at the bottom.
The next screen is titled Connect to database. There are 6 fields in this screen:
The first two options are Database type and Database host.
The top field labelled Database Type, should be left as default which is MySQL.
Next we have the Database host, leave this as localhost.
Next we have the Database table prefix. Leave this blank.
Leave the Database username as root.
Which leaves only the last field on this page which you need to input something into, the Database password. Enter the password you entered at the beginning of the installation process when asked for the MySQL password.
Then click continue.
The next screen entitled Database Settings has three options, which should be left on the default settings.
Database account for web access, leave the Check box "Use the same account for installation" checked.
Storage Engine, the default InnoDB option should be used.
Database character set, again leave this as Binary.
The next page is titled Name and is where you personalise the name of your wiki.
The top field is for the name of the wiki. You can enter what you want in here, but I will call mine TrevorWiki.
The second field is the Project namespace, leave this option as the default, which is Same as the wiki name.
The third line is for the wiki administrators name. I am going to put Wiki Admin in here.
The next two boxes are for your password. So enter the password into both boxes.
Enter your E-mail address in the next field if you want to. I tend to leave this blank.
Finally there is a box asking if you want to be asked more questions, or if you are bored and want to install the wiki. I opt for more questions, which is the default option.
If you are, as the options suggest, bored, then please feel free to choose the other option!
Then click Continue.
The Options screen.
I leave the wiki as a Traditional wiki, which is the default option.
For Copyright and license, I leave this as the default option which is No license footer.
For the E-mail settings, I leave all these as standard.
Extensions, I leave all these as standard.
Images and file uploads, I check the enable file uploads box (shown here unchecked).
Finally in the Advanced configuration. Select PHP object caching (APC, XCache or WinCache)
Then click on Continue
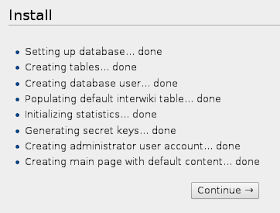
The next screen is titled Install. By clicking on Continue, you will begin the installation.
This might take a few minutes.
You should now see a window which shows all parts of the install is complete.
Click Continue.
You should now have a window which says Congratulations!
Very nearly there! Reading this message it states that you have generated a LocalSettings.php file. You now need to download it and put it in the base of your wiki installation (the same directory as index.php)
This file should have downloaded automatically, but if not you can click on the Download LocalSettings.php icon.
To move this file to the right place.
Via SSH type
sudo mv Downloads/LocalSettings.php /var/lib/mediawiki
At the moment the wiki is only displayed in text mode. You need to modify one line in the LocalSettings.php to rectify this.
To modify the LocalSettings.php file type the following into the command line.
sudo nano /var/lib/mediawiki/LocalSettings.php
Press the down arrow until you get to the line which says:
$wgServer = "http://localhost"
and comment this out by placing a # in front of it.
#$wgServer = "http://localhost"
Press Ctrl-X to save the changes
Press Y when asked if you want to save the modified buffer.
Press return when asked to save the file LocalSettings.php
Congratulations, you have now installed MediaWiki!
To access the MediaWiki server from another computer on your network. Load a web browser from a computer on your network, and type the following into the webbrowser
http://IPaddress/mediawiki/index.php/Main_Page
Replacing IPaddress with the IP address of the MediaWiki server. If you do not know what the IP address of your Raspberry Pi is you can find it by following this blog post on remotely finding your Raspberry Pi IP address.
Watch out for future posts explaining more about MediaWiki!


Excellent instructions - thank you!
ReplyDeleteSimon.
Trevor Appleton: Installing Mediawiki On A Raspberry Pi >>>>> Download Now
Delete>>>>> Download Full
Trevor Appleton: Installing Mediawiki On A Raspberry Pi >>>>> Download LINK
>>>>> Download Now
Trevor Appleton: Installing Mediawiki On A Raspberry Pi >>>>> Download Full
>>>>> Download LINK JE
Hi!
ReplyDeleteDid Apache/MySQL work out good for you as far as speed goes?
I used the default LAMP-setup and even with php-caching I got pretty horrible response times when connecting to the wiki (I had imported about 100 pages from another wiki I run).
I got between 10-30 seconds just to load a single page, which pretty much made it unusable imo. And the CPU-load from Apache was pretty intense with each request too.
If you got this working satisfactory, I would love to know what you did that I missed :)
I've been trying to swap to a nginx/sqlite setup instead in hope of that making things faster, but my very lowlevel linux skills is making this a hassle :p
Mediawiki installation is really easy if you already have the stack installed and configured on your server. After installing MediaWiki, you can also easily connect MySQL database with the site.
ReplyDeleteGreat Article
ReplyDeleteB.Tech Final Year Projects for CSE in Python
FInal Year Project Centers in Chennai
Python Training in Chennai
Python Training in Chennai
What I really wonder is, how fast is it? Could you share any approximate load times?
ReplyDeleteWe Give out personal loans for debt consolidation, bad credit loans, unsecured loans, loans for bad credit and instant secured loans with cheap rates Do you have a firm or company that need loan to startup a business or need, personal loan, Debt consolidation? For more information. We will provide you with loan to meet your needs. For more information contact Note: And many More:and many more at 2%interest rate; (Whats App) number: +919394133968 patialalegitimate515@gmail.com Mr Jeffery
ReplyDeleteTrevor Appleton: Installing Mediawiki On A Raspberry Pi >>>>> Download Now
ReplyDelete>>>>> Download Full
Trevor Appleton: Installing Mediawiki On A Raspberry Pi >>>>> Download LINK
>>>>> Download Now
Trevor Appleton: Installing Mediawiki On A Raspberry Pi >>>>> Download Full
>>>>> Download LINK
This is a great guide on how to set up MediaWiki.
ReplyDelete