He told me he wanted to set up Volumio. I have to admit I had never heard of Volumio, but by the time we were finished setting it up, I was sold! It is very cool! What's more it was so easy to set up! Almost too easy to warrant a blog post...
However - where is the fun in that?
So what is Volumio? Well Volumio calls itself a Linux Audiophile Music Player. Basically it turns your Raspberry Pi, or many other devices, into a Music Player. You can simply add a USB stick with your music on it, and Volumio will play it. The great thing is you control the music remotely, so don't need anything other than a speaker/headphones connected to your Raspberry Pi.
So first of all you will need to download Volumio. Go to their website, and click on Download.
Once the download is completed you need to flash it onto a suitable SD Card. I am assuming that you already know how to do this, but if not, there are instructions on the Volumio web site on how to do this using either Linux, MacOSX or Windows. It's the same method as you would load any Linux distribution onto a SD Card.
For the purposes of trying this out, I am using a 4GB card. However Volumio is fairly small so has no problem fitting on a card that size.
Once that is done put the newly created SD card into your Raspberry Pi and fire it up! At this point you will need to have your Raspberry Pi connected to your router via an ethernet cable. We will sort out going wireless later.
Open an internet browser on your computer, and go to the following link:
Your screen should look something like this.
How easy was that?
However there is no point having an Audiophile Music Player without any music to play.
The next thing you need to do is to put some music onto a USB stick, and insert this into your Raspberry Pi. You might notice the bottom left of the screen indicates it is Updating. This takes a few minutes depending on how many songs you have on the USB stick.
Once completed this will resort back to saying Browse.
Plug your Headphones / Speaker into the Headphone Port of your Raspberry Pi. On older Raspberry Pi's this is the blue port, or on a Raspberry Pi 2 the port next to the HDMI port.
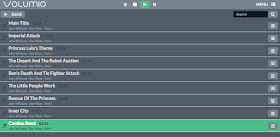
Now click on Browse and then on USB, and then follow your filing system on your USB stick until you find the song you want to play and double click on it.

Here I chose the Cantina Band from the Star Wars album. A message will appear saying you have added it to the playlist. It should start playing immediately.
Selecting other songs will add them to the play list also. Click on Playlist at the bottom to view the Playlist you have created.

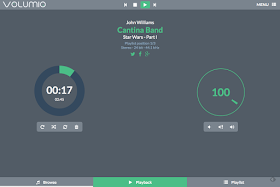
The Playback menu allows you to see what is playing and change the volume etc.

It really is so simple and intuitive to use!
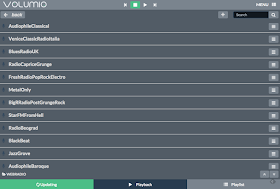
Want to listen to internet radio? Instead of clicking on USB, you can click on Web Radio. There are a number of pre-defined radio stations.

Earlier I mentioned that you can set this up so it works over WiFi. I use an Edimax EW-7811UN Dongle, but I have also tested this with a Wi-Pi dongle and they both work equally well. You can pick these up cheaply on the internet.
To set this up click on Menu and then Network.
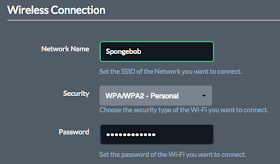
Type in your Network Name, for me this is Spongebob (Don't judge me - ok?), the type of security you have, along with your password.

Selecting other songs will add them to the play list also. Click on Playlist at the bottom to view the Playlist you have created.

The Playback menu allows you to see what is playing and change the volume etc.

It really is so simple and intuitive to use!
Want to listen to internet radio? Instead of clicking on USB, you can click on Web Radio. There are a number of pre-defined radio stations.

Earlier I mentioned that you can set this up so it works over WiFi. I use an Edimax EW-7811UN Dongle, but I have also tested this with a Wi-Pi dongle and they both work equally well. You can pick these up cheaply on the internet.
Type in your Network Name, for me this is Spongebob (Don't judge me - ok?), the type of security you have, along with your password.

Finally click on Save Changes. They may take a few minutes to save. However once finished you should see your Edimax Blue LED Light up.
You can now remove your network cable, and be connected wirelessly.
And there you have it, your Raspberry Pi is a fully functioning Jukebox!
You can now remove your network cable, and be connected wirelessly.
And there you have it, your Raspberry Pi is a fully functioning Jukebox!
Take Volumio a step further and download an app, so you can
control your music selections using your phone or tablet. Enjoy!


I find RuneAudio sounds so much better thatn Volumio
ReplyDeleteGreat Article
ReplyDeleteB.Tech Final Year Projects for CSE in Python
FInal Year Project Centers in Chennai
Python Training in Chennai
Python Training in Chennai
Buon sito web : Zonahobisaya
ReplyDeleteBuon sito web : Sinopsis Film Terbaru
Buon sito web : Zonahobisaya
Buon sito web : Zonahobisaya
Buon sito web : Profil
Buon sito web : Zonahobisaya
Buon sito web : Zonahobisaya
Buon sito web : Zonahobisaya