Monday, 1 April 2013

Installing MediaWiki on a Raspberry Pi

I cannot sing the praises of MediaWiki highly enough. For those who don't know, MediaWiki is the program which is used for Wikipedia. I introduced the company I work for to MediaWiki so they could use it as a repositry for all the information about projects, HR, Finance, IP etc. Basically anything which should be written down and referred to in the future is stored in the wiki.

As an experiment I installed MediaWiki on my Raspberry Pi. I was surprised how well it ran and thought I would share with you the installation process for this. That way you can have your own personal wiki to store information about your school, information about your projects, or even information about your Raspberry Pi. In short anything which you normally jot down can be stored in the wiki and easily retrieved...

Before we get onto the installation of MediaWiki its worth pointing out that you are installing a LAMP server onto your Raspberry Pi. So what does LAMP stand for? It stands for Linux, Apache, MySQL and PHP.
  • Linux, you should all be familiar with, I hope. :-)
  • Apache is a web server. You will be connecting to the wiki remotely, via a web browser,  from another machine.
  • MySQL is a database to store all the information from the wiki. 
  • PHP is a programming language used for web applications. 
Sometimes the P in LAMP stands for other programming languages such as Python or Perl. But in this case it stands for PHP.

OK enough talking on with it!

Installation

Most of the installation will be through the command line. You can do this directly through LXTerminal (the icon for this is on the Raspberry Pi desktop) or accessing your Raspberry Pi remotely via SSH.

sudo apt-get update


sudo apt-get install mediawiki


You will shortly be asked for a password for MySQL. It is a good idea to set a password at this time.


You are then asked to repeat your password. This ensures you have typed it in correctly.


Now you need to modify a file called apache.conf. This file is stored in the 'mediawiki' folder, which in turn, is inside the 'etc' folder. We can modify this using a text editor called nano through the command line. To do this type:

sudo nano /etc/mediawiki/apache.conf


We need to remove the # from the third line down so it changes from

#Alias /mediawiki /var/lib/mediawiki


to

Alias /mediawiki /var/lib/mediawiki


As we are doing this in the command line you need to move down to the start of the third line by pressing the down arrow on the keyboard twice. To delete the # press the delete key.

Now to save the file you need to press Ctrl-X (Press the control key and while holding this down, press the X key). A message will appear asking if you want to save the file.


Press Y and then return.

Great you have just modified your file using only the command line.

Next you need to install php-apc for object caching and Imagemagick for thumbnailing.

Lets do both these together shall we?

sudo apt-get install php-apc imagemagick


press Y when asked do you want to continue.

Dont worry if you find one of these has already been installed.

You now need to restart the apache server by typing.

sudo apache2ctl restart


For those of you who read the comments of my blog you will notice that something changed recently which meant these instructions stopped working. Thanks to some other excellent comments a fix was suggested. So we will quickly carry out that fix.

The first thing you need to do is to edit the apache2.conf file

sudo nano /etc/apache2/apache2.conf

Scroll to the bottom of this file and type

Include /etc/mediawiki/apache.conf

Press Ctrl-X to save, and type Y to agree to the changes.

Now you will need to restart the apache2 server by typing

sudo /etc/init.d/apache2 restart

That should fix any issue there was, so we can now continue as though there was never a problem! :-)

Right thats all we can do by SSH for now.

We now need access to the desktop on the Raspberry Pi. If you want to remotely access your Raspberry Pi desktop follow these instructions to VNC into the Raspberry Pi first. If you are directly connected, or have already connected via VNC, then the first thing you need to do is open your web browser.

When I first wrote this blog post the choice of default web browsers on the Raspberry Pi was poor, and you had to install Chromium to carry out the next stage. However the latest versions of Raspbian ship with Chromium already installed. Just be aware that there may be issues with some browsers when carrying out the next stages.

Open up the Chromium Web Browser and type the following web address into the address bar at the top.

http://localhost/mediawiki


Which should now take you to a web address with the following icon and information below it.


Click on the blue text below which says "set up the wiki"

The first screen asks you to select your language. If you are happy with the default options, then you can just click on Continue.


The next page shows that some Environmental Checks have been carried out.

Approximately halfway down the page you should see the following message.


There is nothing you need to type in this window, so you can click on continue at the bottom.


The next screen is titled Connect to database. There are 6 fields in this screen:

The first two options are Database type and Database host.

The top field labelled Database Type, should be left as default which is MySQL.
Next we have the Database host, leave this as localhost.


For Database name, I leave this as the default my_wiki, there is no real reason to change this.
Next we have the Database table prefix. Leave this blank.


Leave the Database username as root.
Which leaves only the last field on this page which you need to input something into, the Database password. Enter the password you entered at the beginning of the installation process when asked for the MySQL password.


Then click continue.


The next screen entitled Database Settings has three options, which should be left on the default settings.

Database account for web access, leave the Check box "Use the same account for installation" checked.
Storage Engine, the default InnoDB option should be used.
Database character set, again leave this as Binary.


Click on Continue


The next page is titled Name and is where you personalise the name of your wiki.

The top field is for the name of the wiki. You can enter what you want in here, but I will call mine TrevorWiki.
The second field is the Project namespace, leave this option as the default, which is Same as the wiki name.


The third line is for the wiki administrators name. I am going to put Wiki Admin in here.
The next two boxes are for your password. So enter the password into both boxes.
Enter your E-mail address in the next field if you want to. I tend to leave this blank.


Finally there is a box asking if you want to be asked more questions, or if you are bored and want to install the wiki. I opt for more questions, which is the default option.

If you are, as the options suggest, bored, then please feel free to choose the other option!

Then click Continue.


The Options screen. 

I leave the wiki as a Traditional wiki, which is the default option.


For Copyright and license, I leave this as the default option which is No license footer. 


For the E-mail settings, I leave all these as standard.


Extensions, I leave all these as standard.


Images and file uploads, I check the enable file uploads box (shown here unchecked).


Finally in the Advanced configuration. Select PHP object caching (APC, XCache or WinCache)


Then click on Continue

The next screen is titled Install. By clicking on Continue, you will begin the installation.


This might take a few minutes.

You should now see a window which shows all parts of the install is complete.


Click Continue.

You should now have a window which says Congratulations!


Very nearly there! Reading this message it states that you have generated a LocalSettings.php file. You now need to download it and put it in the base of your wiki installation (the same directory as index.php)

This file should have downloaded automatically, but if not you can click on the Download LocalSettings.php icon.

To move this file to the right place.

Via SSH type

sudo mv Downloads/LocalSettings.php /var/lib/mediawiki


At the moment the wiki is only displayed in text mode. You need to modify one line in the LocalSettings.php to rectify this.

To modify the LocalSettings.php file type the following into the command line.

sudo nano /var/lib/mediawiki/LocalSettings.php


Press the down arrow until you get to the line which says:

$wgServer = "http://localhost"

and comment this out by placing a # in front of it.

#$wgServer = "http://localhost"


Press Ctrl-X to save the changes

Press Y when asked if you want to save the modified buffer.

Press return when asked to save the file LocalSettings.php

Congratulations, you have now installed MediaWiki!

To access the MediaWiki server from another computer on your network. Load a web browser from a computer on your network, and type the following into the webbrowser

http://IPaddress/mediawiki/index.php/Main_Page


Replacing IPaddress with the IP address of the MediaWiki server. If you do not know what the IP address of your Raspberry Pi is you can find it by following this blog post on remotely finding your Raspberry Pi IP address. 

Watch out for future posts explaining more about MediaWiki!

Monday, 25 March 2013

Keeping your Raspberry Pi updated with APT

Many Linux distributions including Raspbian for the Raspberry Pi come with the APT (Advanced Package Tool) package manager.

Access to this is often available as a GUI (Graphical User Interface), to help you update, upgrade and install new software packages on your computer. However if you can use APT via the command line you can save yourself a lot of time.

As a reminder to gain access to the command line, if you are logged directly into  the Raspberry Pi, you will need to load Terminal (click LXTerminal on the desktop). Alternatively Remotely logging into the Raspberry Pi via SSH gives you access to the command line.

Update

The first thing is to ensure you are using the latest versions of software. There are two stages to this. First you want to update the list of available software which is stored locally on your machine. You should always do this before starting any type of upgrade. To do this simply type:

sudo apt-get update


To then upgrade any software packages type:

sudo apt-get upgrade


and enter y when asked "Do you want to continue [Y/n]?"

Search

To search for a package that you would like to install type:

sudo apt-cache search packagename

i.e. for chromium


Install

To then install this package:

sudo apt-get install packagename

i.e. for chromium


Before running this command it is often worth running with the flag -s, which simulates the install. This enables you to check that the install is only installing what you expected:

sudo apt-get install -s packagename

i.e. for chromium


Remember to run the command without the -s flag to actually install the package once you have simulated it.

Uninstall

To remove a software package use:

sudo apt-get remove packagename

i.e. for chromium


Again its worth running this with the simulation flag -s first to check everything is as expected:

sudo apt-get remove -s packagename

i.e. for chromium


Kernel Update

Every so often the kernel or core program needs to be updated. This is not updated using the apt-get upgrade command, so you need to specifically tell it to update the kernel. This is done by typing:

sudo apt-get dist-upgrade


Hopefully this has given you a brief  introduction into the APT package manager and how to keep all your software packages up to date using the command line.

Monday, 18 March 2013

Remotely Connect to a Raspberry Pi Desktop

I run my Raspberry Pi as a headless server. That is I don't have a television, mouse or keyboard attached to it. I log in remotely using SSH, or Secure Shell. Generally having access to the command line allows you to do most of what you need to do. However there are the odd times when you need access to a desktop on the Linux system.

So without having to connect my Raspberry Pi to a television and other peripherals how do I log into it remotely and have access to the desktop? The answer is by installing a VNC (Virtual Network Computing) server.

Installing a VNC Server on the Raspberry Pi

The first stage of this is you need  to install tightvncserver on the Raspberry Pi.

So once you have either remotely logged into your Raspberry Pi using SSH or, if you are logged in directly, you have opened LXTerminal, you need to install a VNC Server. Remember to update the list of available software packages first:

sudo apt-get update


Then install Tight VNC Server with:

sudo apt-get install tightvncserver


When asked 'Do you want to continue [y/n]?' press 'y'.

tightvncserver and probably a few other programs which tightvncserver is dependant on will install.

Now to configure this type:

tightvncserver


and you will be asked to type in a password. You will need to remember this for later!

Although it doesn't matter what you use for your password, tightvnc only uses the first 8 characters of your password. However if you type in more than 8 characters, that is fine, it will always ignore the characters you type after the first 8. The reason I say this is typing more than 8 characters produces the following warning.


If you are happy with the password you have chosen, then don't worry about this message. Personally - I just ignore it. :-)

You are then asked to verify your password, so simply retype your password.

The next question is 'Would you like to enter a view-only password (y/n)?'


I dont think this is necessary, so I enter 'n'. However if you think you would use it then press 'y'.

At this stage the VNC server is running. In subsequent reboots, to start the VNC server, now you have installed it you would have to type:

vncserver :1


Software to Enable Logging in Remotely

Once you have the VNC Server up and running you can now log into it from another machine.

If you don't have already, you will need a piece of software on the Mac or PC to log into this. I tend to use TightVNC Server on the PC and Chicken of the VNC on the Mac

TightVNC server can be downloaded from here.

http://www.tightvnc.com/

Chicken of the VNC for the Mac can be downloaded from here:

http://sourceforge.net/projects/cotvnc/

Using TightVNC

For TightVNC server you need to type the IP address of the Raspberry Pi into the text box. If you don't know what the IP address is you can follow these instructions to remotely find the IP address of your Raspberry Pi.


Click on connect and there you have it a GUI connection from another computer into your Raspberry Pi.


Using Chicken of the VNC

To use Chicken of the VNC, next to host type your IP Address followed by a colon and 5901 i.e.

192.168.1.66:5901

For those wondering what the 5901 signifies, this is specifying the port number. This number should be equal to 5900 + the number you typed in after vncserver. In our case we typed vncserver :1 so the port is 5900 + 1 which is 5901.

You will then need to type your password you entered when installing vncserver.

Finally click connect!


A window should appear showing your Raspberry Pi Desktop!


Monday, 4 March 2013

Remotely Find Raspberry Pi IP Address

Recently I have two examples where I have needed to find devices on the local network and to establish their IP addresses.

The first of these was with my Raspberry Pi. I tend to run this as a headless server and normally SSH into it. This is impossible until I have established its IP address.

The second, and more recent, is with a new piece of hardware which the company I work for has developed. This runs embedded Linux and requires us to find its IP address in order to operate it.

For my Raspberry Pi my usual method of finding the IP address was to log into my router and check which devices were connected. As I regularly reformat my Raspberry Pi this is something I need to do often. I have always felt this was extremely cumbersome, and I am forever scrabbling around trying to find the log in details for my router.

When my colleagues needed to find our new device on the network at work, I explained my method of logging into the router and checking for the IP addresses. The company router however was not as friendly as my home one, and promptly spat out a list of 20 IP addresses. My colleagues checked these manually to find the new device. Needless to say this took time and is not a long term solution.

As an experiment I wrote a python script to ping all the IP addresses, and log the one we required. My fears were correct, that pinging 256 IP address was extremely slow!

Surely there must be a better way to do this? Initial Google searches showed other people stating they connected a TV and keyboard to the Raspberry Pi. They could then determine the IP address by typing ifconfig into the command line. What a pain!

Further searching revealed an excellent tool called nMap.

http://nmap.org

Even more appealing is the fact it works with Linux, Mac and Windows. I need to use it on all three.

I installed it on a Linux machine and ran the following from a command line:

sudo nmap -sn 192.168.1.0/24


Within seconds a list of all connected devices and their IP addresses appeared. Problem solved!

So how do you install nMap?

On a Linux system such as Raspbian it's simple. Just type the following into the command line:

sudo apt-get install nmap


Windows and Mac users need to run an installer which has the option of running a GUI (Graphical User Interface) version called Zenmap.

The installer can be found on the nmap website here:


Using nmap

I would recommend using the command line where possible. It really does save time and effort not having to run a GUI. Particularly if you are remotely logged in via SSH.

For Linux the command would be:

sudo nmap -sn 192.168.1.0/24


sudo is required to give you root permissions.

For Mac and PC just type:

nmap -sn 192.168.1.0/24


If you prefer a GUI version rather than using the command line then you are in luck! During installation onto the Apple Mac or PC you have the option to install Zenmap.

To use this load Zenmap and follow the three easy commands below.


  1. In the Target box type: 192.168.1.0/24
  2. Select Profile: Ping scan
  3. Click on: Scan
This should give you the same results you would obtain from the command line.

I hope you all find this as useful as I did!

Friday, 1 March 2013

SSH into Raspberry Pi

I generally log into my Raspberry Pi via SSH, or Secure Shell to give it its full name. This allows command line access, to your Raspberry Pi, from another computer. Although it is possible to SSH into the Raspberry Pi from anywhere in the world, and I do, this post only covers SSH access over the local network. I will cover remote connection in a future blog post.

Although this does not give access to a GUI (Graphical User Interface), having access to the command line generally allows me to do 95% of what I need to do. The other 5% I could probably do through SSH, but sometimes you can't beat the comfort of a GUI. :-)

First of all you need to know the IP address of the Raspberry Pi you are wanting to log into. If you are unsure how to find this, then read my blog post explaining how you can do this remotely using an excellent tool called nmap.

Blog post explaining how to remotely find IP addresses using nmap.

To SSH into your Raspberry Pi from a Linux or Apple Mac computer this is very easy. You can just type your username and IP address into the command line using the following format:

ssh username@IPaddress


Ensure you substitute username with the username you are wanting to log into the remote computer with. The IP address should take the format 192.168.1.66

You may get a message explaining that the authenticity of the host cannot be established, and if you are sure you want to continue connecting.  You will only see this message the first time you SSH into your Raspberry Pi. Simply type yes.


You will then be asked for your password, enter the password for the username you are trying to connect with.

For windows this is a little more tricky to set up as it requires an additional piece of software called PuTTY. However once installed this is really simple to use.

First go to the PuTTY website, www.putty.org, download and install the software.

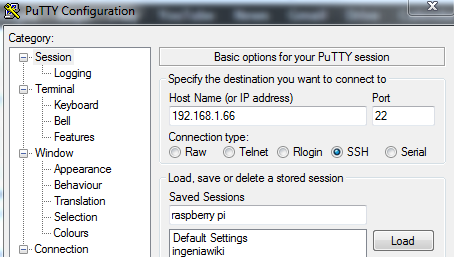
Once installed load PuTTY


  • Under Host Name (or IP address) type in the IP address you would like to connect to.
  • Select the SSH radio button.
  • In the box under Saved Sessions type in a name to identify this computer, such as Raspberry Pi, and then click Save.
  • Clicking on Open should now start your SSH session.

Next time you want to SSH into your Raspberry Pi you just need to load PuTTY, click on the saved session to highlight it and then click Open. Once you have typed in your password, when asked, you have remote access to your Raspberry Pi.